 Arch Linux installation Arch Linux installation
This is for GPT Partition and UEFI boot loader. I'll use grub2 and Windows dual boot. Start by creating your Partitions make sure to use GPT.
Keep in mind that if you use a newer computer you have to disable secure boot from the bios before trying to run the installation also disable fastboot and if you want to dual book with Windows then it is easier you installed Windows before you install Arch Linux for since Windows likes to overwrite the boot-loader. Now you can run the Arch Linux installation CD
#Check if you are booted up in EFI
ls /sys/firmware/efi/efivars
if needed change the keyboard layout loadkeys 
#for Danish keyboard.
loadkeys dk-latin1
#Set time
timedatectl set-ntp true
#check for internet connection
ping -c 3 goggle.com
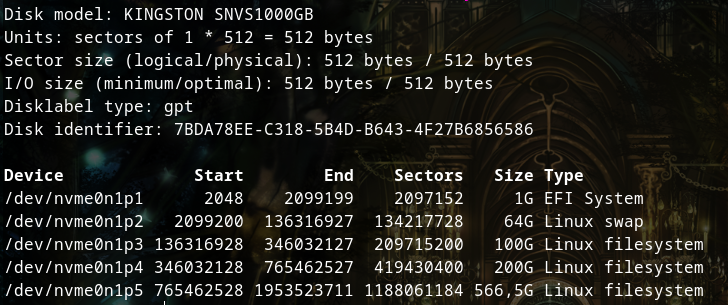
Next check your Partition with fdisk I have a nvme drive so it will look something like you can see below.
if you use ssd drive or hdd drive it will show up as /dev/sda instead fdisk -l

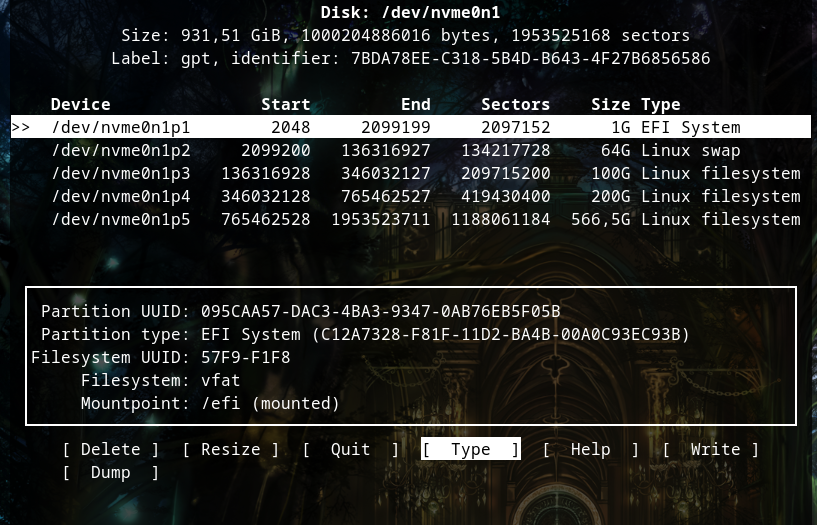
Next, you can use cfdisk to make the patrons I prefer cfdisk to fdisk because of the graphic interface. #For ssd or hdd
cfdisk /dev/sda #For nvme.
cfdisk /dev/nvme0n1

First create a boot disk for the efi boot loader remember /efi must be formatted in fat32 or vfat do not use ntfs Reallocate around 1gb disk space for your boot drive select Type in cfdisk and choose EFI System For the swap drive it is recommended to double the size of RAM. i have 32gb of ram so 64gb disk-space for the swap drive. Select Type in cfdisk and choose Linux Swap Reallocate around 100gb for the root drive / Please note that the layout can look different from mine since I have not installed Windows this time. Reallocate the rest of the disk space for /home this is where your user directory is going to be it needs the most space when done select write and type yes to confirm. Now you have to format your hard drives . check the config with fidsk -l or lsblk 
#Make the swap mkswap . note that on SSD or HDD it the command will be mkswap /dev/sda2 instead.
mkswap /dev/nvme0n1p2
#Set swap on 
swapon /dev/nvme0n1p2
# /efi Time to format the hard disks
mkfs.vfat /dev/nvme0n1p1
# / root
mkfs.ext4 /dev/nvme0n1p3 #My extra disk /virtual for virtual-box..
mkfs.ext4 /dev/nvme0n1p4 # /home
mkfs.ext4 /dev/nvme0n1p5
Now we need to mount the root Partition or hard disk in /mnt so that we can create the directories for Arch Linux. #Mounting nvme0n1p3 in the root dir /mnt
mount /dev/nvme0n1p3 /mnt #next we create the directories on the hard disk.. First the boot disk /efi
mkdir /mnt/efi # create the directory /virtual in /mnt
mkdir /mnt/virtual # create the directory /home in /mnt
mkdir /mnt/home
#now mount the partitions to point to the new directories in /mnt/
mount /dev/nvme0n1p1 /mnt/efi
mount /dev/nvme0n1p4 /mnt/virtural
mount /dev/nvme0n1p5 /mnt/home
#Now you can finally start on the installation ( it's a good idea to install nano + network right away)
pacstrap -K /mnt base linux linux-firmware nano networkmanager network-manager-applet
Next it's time to generate your fstab
genfstab -U /mnt >> /mnt/etc/fstab
chroot into your new system.
arch-chroot /mnt
#Make sure that your fstab is as it should be it should list your Hard drives ( to exit nano press CTRL +x )
nano /etc/fstab
also check out pacman.conf
nano /etc/pacman.conf
#Check out the mirrors with nano ( to exit nano press CTRL +x )
nano /ect/pacman.d/mirrorlist
if you want to use 38bit applications you will need to uncomment #multilib
#it should look like this in nano
[multilib]
Include = /etc/pacman.d/mirrorlist
#synchronize pacman if you uncommented multilib
pacman -Syy Let's make sure the mirror list is up-to-date and has the newest servers available.
#copy pacman.d/mirrolist to the /ect/pacman./mirrorlist.backup
cp /etc/pacman.d/mirrorlist /etc/pacman.d/mirrorlist.backup #To restore the file use mv to move or cp to copy the file like this:
# mv /etc/pacman.d/mirrorlist.backup /etc/pacman.d/mirrorlist
# first you need to download reflector with pacman
pacman -S reflector rsync curl
#Use reflector to generate a mirror list.
reflector --latest 50 --age 24 --protocol https --sort rate --save /etc/pacman.d/mirrorlist
#Synchronize pacman
pacman -Syyu
#next set your keyboard
nano /etc/locale.gen
#uncomment your keyboard in my case it's #en_DK.UTF-8 UTF-8 that I'll need since I use a Danish keyboard
en_DK.UTF-8 UTF-8
en_DK ISO-8859-1
Generate locales
locale-gen
#Copy and export the settings
echo LANG=en_DK.UTF-8 > /etc/locale.conf
export LANG=en_DK.UTF-8
#Now setup Vconsole
nano /etc/vconsole.conf
#Type in your keyboard . uk or dk-latin1
KEYMAP=dk-latin1 FONT=Lat2-Terminus16
FONTMAP=
#list the time zones type
ls /usr/share/zoninfo/
#Set your timezone
ln -sf /usr/share/zoninfo/Europe/Copenhagen /etc/localtime
#Setup your clock
hwclock --systohc --utc
#Set your hostname
nano /etc/hostname
#Write your host-name / computer name and press CTRL +x to save and exit
Your_host_name
#next create an initial ram-disk environment
mkinitcpio -P
#set root password, note that you wont be able to see * as you type your password, since it uses shadow
passwd root
Retype the password to confirm
#Setup a user account in the wheel group
useradd -m -g users -G wheel -s /bin/bash yourname
Set your password, its the same as above you wont be able to se that your typing.
passwd yourname
Retype the password to confirm
#Download sudo for root access with out longing to root
pacman -S sudo
#now open visudo and uncomment the %wheel All=(ALL)ALL
EDITOR=nano visudo
#Download grub, dosfstools,osprober and efibootmgr
pacman -S dosfstools grub efibootmgr os-prober
#install grub
grub-install --target=x86_64-efi --efi-directory=efi --bootloader-id=GRUB
# make grub cfg file use : grub-mkconfig -o /boot/grub/grub.cfg for virtual-box or if you are unable to boot into arch.
grub-mkconfig -o /efi/EFI/GRUB/grub.cfg
If you didn't get any errors then remove the cd and reboot the computer
exit
reboot # In case you can't boot from grub then load your installation CD and remount dev/sda3/ mnt and dev/sda1 /mnt/efi go into arch-chroot and try reinstalling grub " grub-mkconfig -o /boot/grub/grub.cfg ".. #If you installed the NetworkManager for internet..then it is time to start up it.
systemctl start NetworkManager.service #to have NetworkManager startup automatically enable it.
systemctl enable NetworkManager.service
Now you should have booted back up into your new system its time to add windows to the boot loader
First get archlinux ntfs-3g so that linux can read NT filesystem.
sudo pacman -S ntfs-3g 
#Run os-prober
os-prober
#remake the grub.cfg it should now have detected your windows installation
grub-mkconfig -o /boot/grub/grub.cfg
If you want to access the extra disk as your user you can set up an link to that disk.. First your user needs to have the right permissions currently if you mounted the disk in /mnt it is owned by root and .. #change the permissions with chown your_username:your_group
sudo chown your_username:wheel /virtual #use ln to create a symbolic link
ln -s /virtual /home/your_username/vitual
| 

 Arch Linux installation


Comments